LLM Security: DDOS Attacks
LLM Security: DDOS Attacks
Section titled “LLM Security: DDOS Attacks”Introduction
Section titled “Introduction”In the LLM OWASP Top 10, DDOS attacks were originally included but later removed during a revision. However, DDOS attacks are still frequently used. This article covers related content by dividing attacks into network layer, application layer, and model layer.
Knowledge about network layer and application layer largely overlaps with traditional DDOS, because model services or APIs are essentially internet assets. Let’s first understand how DDOS is conducted at the network, application, and model layers.
Imagine going to a restaurant to eat. A network-layer DDOS is like causing traffic jams on the road, an application-layer DDOS is like crowding the restaurant, and a model-layer DDOS is like preventing the chef from cooking. Translating to real scenarios, the network layer targets traffic to the server (bandwidth), the application layer targets the processing capacity of server applications and middleware (connections, CPU, memory, etc.), and the model layer targets the large model itself (the GPU), consuming compute power and tokens.
Reflection and Amplification
Section titled “Reflection and Amplification”Let’s start with the network layer, which mainly leverages various network protocols. Here we introduce two concepts: reflection and amplification.
Suppose there is a target machine, a DNS server, and an attacker. The attacker sends a forged DNS query but spoofs the source IP address to be the target’s IP. When the DNS server processes the request, it sends the response back to the source IP in the packet – so the response meant for the attacker instead goes to the target. This mechanism, similar to light reflecting, is called a reflection attack.
Reflection attacks have several characteristics. First, they rely on UDP, which does not verify the source, allowing the attacker to spoof the source IP easily and hide their own IP, making detection difficult. Second, if multiple DNS servers across the internet are used, the target receives responses from all over the world, causing a massive influx of packets and a surge in bandwidth.
Amplification attacks are built upon reflection attacks. Again using DNS, the attacker might send an ANY query (which requests all types of records for a domain and yields a much larger response, often tens of times the query size). The query packet is tiny, but the response contains extensive data. When this larger response is directed at the target, the traffic is amplified – this is an amplification attack.
Amplification attacks also share features: they rely on UDP and require no source verification, allowing the attacker to hide and spoof the source IP. Moreover, the response packet size is significantly larger than the query.
Thus, these are often called reflection-amplification attacks. The network-layer DDOS we discuss later essentially exploits various network protocols for reflection and amplification.
NTP Reflection and Amplification
Section titled “NTP Reflection and Amplification”NTP (Network Time Protocol) synchronizes time across computers on a network, using UDP port 123 by default. Devices query NTP servers to obtain accurate time.
NTP has a monlist instruction. When a client includes this instruction in a request, the NTP server returns the IP addresses of the last 600 clients that queried it, grouped in batches of 6, meaning it responds with 100 packets. Thus, sending one packet triggers about 100 response packets.
Because NTP runs over UDP and does not require client authentication, an attacker can spoof the source address (the victim’s IP). The NTP server then sends all those response packets to the victim, creating a reflection-amplification attack.
The monlist instruction is disabled by default in NTP versions 4.2.7p26 and later; older versions enable it. The exploitation strategy is to scan the internet for NTP services that still support monlist and then use them.
For example, you can use search engines for internet-connected devices to find hosts with port 123 open, then use Nmap’s ntp-monlist script to check for monlist support in bulk, or use Metasploit. Example commands:
nmap -sU -p 123 --script ntp-monlist -iL ip.txt -oN monlist_results.txtMsf example:
auxiliary/scanner/ntp/ntp_monlistAfter identifying vulnerable servers, you can manually verify with:
ntpdc -n -c monlist <IP>Alternatively, you can search on Shodan for the ntpd version. Once you have a list of vulnerable NTP servers and the target, you can write a script (e.g., using Python’s Scapy) to construct the spoofed packets and iterate through the NTP servers to attack the target. AI can easily generate such a script.
Note: The script must run on a server with a public IP and a network provider that does not enforce ISP anti-spoofing checks (i.e., allows IP spoofing). Very few cloud providers support this, as modern regulations generally discard or rewrite packets with forged source IPs.
DNS Reflection and Amplification
Section titled “DNS Reflection and Amplification”DNS resolves domain names to IP addresses and typically runs on UDP port 53. To recall the general flow: when we access a URL locally, the browser first checks its cache, then the system DNS cache, then the hosts file. If no entry is found, the local DNS server (configured in the system) is queried. If that server also lacks the record, it queries root servers, which return the address of the top-level domain server (e.g., for .com). The local DNS then queries that TLD server, which responds with the authoritative DNS server address. Finally, the local DNS queries the authoritative server, which returns the IP.
Refer to the following illustration:
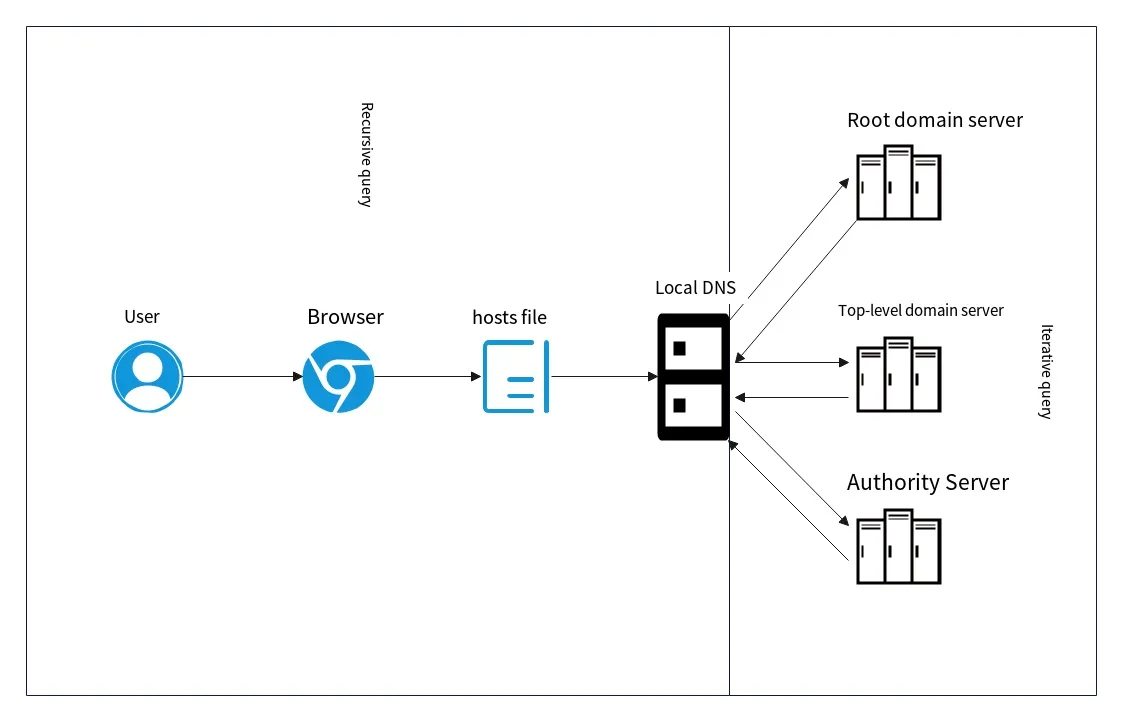
DNS queries can be recursive or iterative. A recursive query means we ask a server to resolve a domain, and if it lacks the record, it continues querying other servers and returns the final result to us – we only make one initial request. An iterative query is when we ask a server, it tells us to query another, and we keep asking until resolved.
From our perspective, the query to the local DNS server is recursive, because the local server will query root, TLD, and authoritative servers on our behalf. From the local DNS server’s perspective, its queries are iterative, because each upstream server only points to the next, not the final IP.
Thus, the local DNS server that supports recursive queries is typically provided by ISPs, cloud providers, or self-hosted. For DNS reflection-amplification attacks, we often look for such recursive resolvers.
The approach is similar to NTP: find servers with port 53 open using search engines, then filter those that support recursion. Example Nmap script:
nmap -sU -p53 --script=dns-recursion -iL dns_ips.txt -oN recursive_results.txtYou can also use tools like DNSChecker. After obtaining a list, you can write a script with Scapy to send spoofed queries. The reflection-amplification principle is the same: forge the target IP, send a query (e.g., an ANY type query requesting all DNS records, which yields a large response), and the response goes to the target instead of the attacker. Again, a server that permits IP spoofing is required.
Memcached Reflection and Amplification
Section titled “Memcached Reflection and Amplification”Memcached is a key-value caching service, similar to Redis, running on port 11211 and supporting both TCP and UDP. You can use set to store data, get to retrieve it, and stats to obtain server information.
Because Memcached supports UDP, and if the service is left unauthenticated, an attacker can exploit it for reflection amplification. The attacker can set a large value beforehand or use stats to generate a large response, then craft a spoofed request with the victim’s source IP.
Finding Memcached servers is similar to other protocols: use device search engines, or scan with Nmap/Masscan. After collecting IPs, check for unauthenticated instances with Nmap:
nmap -iL ip_list.txt -p 11211 --script memcached-info -oN results.txtIf the server is unauthenticated, the output includes Authentication: no. Alternatively, test manually with Telnet:
telnet <IP_address> 11211Once the unauthenticated list is confirmed, use scripts or AI-generated code to launch the attack.
CLDAP Reflection and Amplification
Section titled “CLDAP Reflection and Amplification”LDAP is a lightweight directory access protocol that uses TCP, so three-way handshakes prevent IP spoofing. CLDAP is a UDP variant of LDAP, without such verification, and both run on port 389.
Exploitation consists of sending a RootDSE request, which prompts the server to return detailed directory configuration, capabilities, and naming contexts. This response is often several thousand bytes, creating reflection-amplification conditions.
Nmap’s LDAP scanning scripts mainly target TCP, so results may be inaccurate. It’s best to write a verification script using Python’s Scapy.
SSDP Reflection and Amplification
Section titled “SSDP Reflection and Amplification”SSDP (Simple Service Discovery Protocol) is based on UDP. It’s used by devices to announce their presence on a local network. For example, a TV might broadcast itself so a phone can discover it; a printer uses SSDP to announce itself. Many home routers expose SSDP to the public Internet on UDP port 1900.
SSDP has an M-SEARCH request that returns detailed information about devices, including device description URLs, metadata, and cache entries. This satisfies the conditions for reflection amplification.
You can verify reachable IPs with Nmap:
nmap -sU -p 1900 --script ssdp-discover -iL ips.txt --openSNMP Reflection and Amplification
Section titled “SNMP Reflection and Amplification”SNMP (Simple Network Management Protocol) is used for monitoring network devices (switches, routers, servers, cameras, etc.). It uses UDP port 161. SNMPv2c often has weak default community strings (e.g., public) and includes a GetBulkRequest command that retrieves large amounts of monitoring data, enabling reflection amplification. SNMPv3 uses encryption and authentication, so it cannot be exploited.
Nmap verification:
# Check if SNMP is reachablenmap -sU -p161 --script snmp-info target_IP# Guess common weak community stringsnmap -sU -p161 --script snmp-brute target_IPOr use snmpwalk:
snmpwalk -v2c -c public target_IPWS-Discovery Reflection and Amplification
Section titled “WS-Discovery Reflection and Amplification”WS-Discovery is a device discovery protocol based on UDP port 3702, recently popular for IoT devices. It allows a phone to discover a camera without configuring an app. Although similar to SSDP, WS-Discovery is used for industrial devices and transmits XML, while SSDP targets home devices with plain text.
The amplification relies on a Probe request, whose corresponding ProbeMatch response contains extensive device information, service addresses, and XML fields.
Verification with Nmap:
nmap -sU -p 3702 --script wsdd-discover target_IPMany more protocols can be used for reflection amplification. The principle remains the same: UDP + source IP spoofing + large response packets.
HTTP Flood
Section titled “HTTP Flood”Now let’s look at application-layer attacks. HTTP Flood is straightforward: multithreaded concurrent requests targeting the application/middleware processing capacity. Each full request forces the server to allocate threads, parse the request, and process the task. If the number of requests is high enough, it may also saturate bandwidth, but that’s a network-layer effect. HTTP Flood primarily exhausts application resources. Tools like wrk are commonly used.
Slowloris
Section titled “Slowloris”Slowloris is a slow attack that keeps connections alive to exhaust the server’s connection pool. It’s relatively slower than flood attacks. Both Flood and Slowloris happen after the TCP handshake; Flood rapidly sends complete requests, while Slowloris sends incomplete headers to make the server wait. Tools like slowhttptest exist.
Model Layer
Section titled “Model Layer”Finally, let’s examine DDOS at the model layer. In the context of LLMs, DDOS often means maliciously consuming the target’s tokens. This relates to the tenth item in the TOP10, “Unlimited Consumption,” which will be covered in detail later. Since the inference cost for large models is very high, such attacks can cause outages or massive token drain.
The following example shows an unprotected API that sends user data to a large model without rate limiting. Save the code as a .js file and run with Node:
npm install expressnode xxx.jsCode:
const express = require('express');const app = express();app.use(express.json());
let activeTasks = 0; // Number of concurrent active taskslet totalTokensConsumed = 0; // Total virtual tokens consumed
// Simple token estimation function (simulating real LLM; approx 1.5–2 tokens per Chinese character)function estimateTokens(text) {    return Math.ceil(text.length * 1.5);}
app.post('/api/processData', async (req, res) => {    const startMemory = process.memoryUsage().heapUsed / 1024 / 1024;    activeTasks++;
    const inputData = req.body.data || "";    const tokens = estimateTokens(inputData);    totalTokensConsumed += tokens;
    const requestId = Math.random().toString(36).substring(7);
    // Print real-time monitoring data    console.log(`--- [Request In: ${requestId}] ---`);    console.log(`Concurrent Tasks: ${activeTasks}`);    console.log(`This request tokens: ${tokens} | Total tokens: ${totalTokensConsumed}`);
    // Memory metrics explanation:    // rss: Total physical memory used by the process    // heapUsed: Heap memory actually used by the V8 engine    const mem = process.memoryUsage();    console.log(`Current Memory (RSS): ${(mem.rss / 1024 / 1024).toFixed(2)} MB`);    console.log(`Current Heap Memory (Heap): ${(mem.heapUsed / 1024 / 1024).toFixed(2)} MB`);    console.log(`-------------------------------\n`);
    try {        // Simulate 2 seconds of heavy inference delay        await new Promise(resolve => setTimeout(resolve, 2000));
        activeTasks--;        res.status(200).send(`[${requestId}] Processing Complete`);    } catch (error) {        activeTasks--;        res.status(500).send('System Crash');    }});
app.listen(3000, () => {    console.log('Monitoring server ready: http://localhost:3000');});
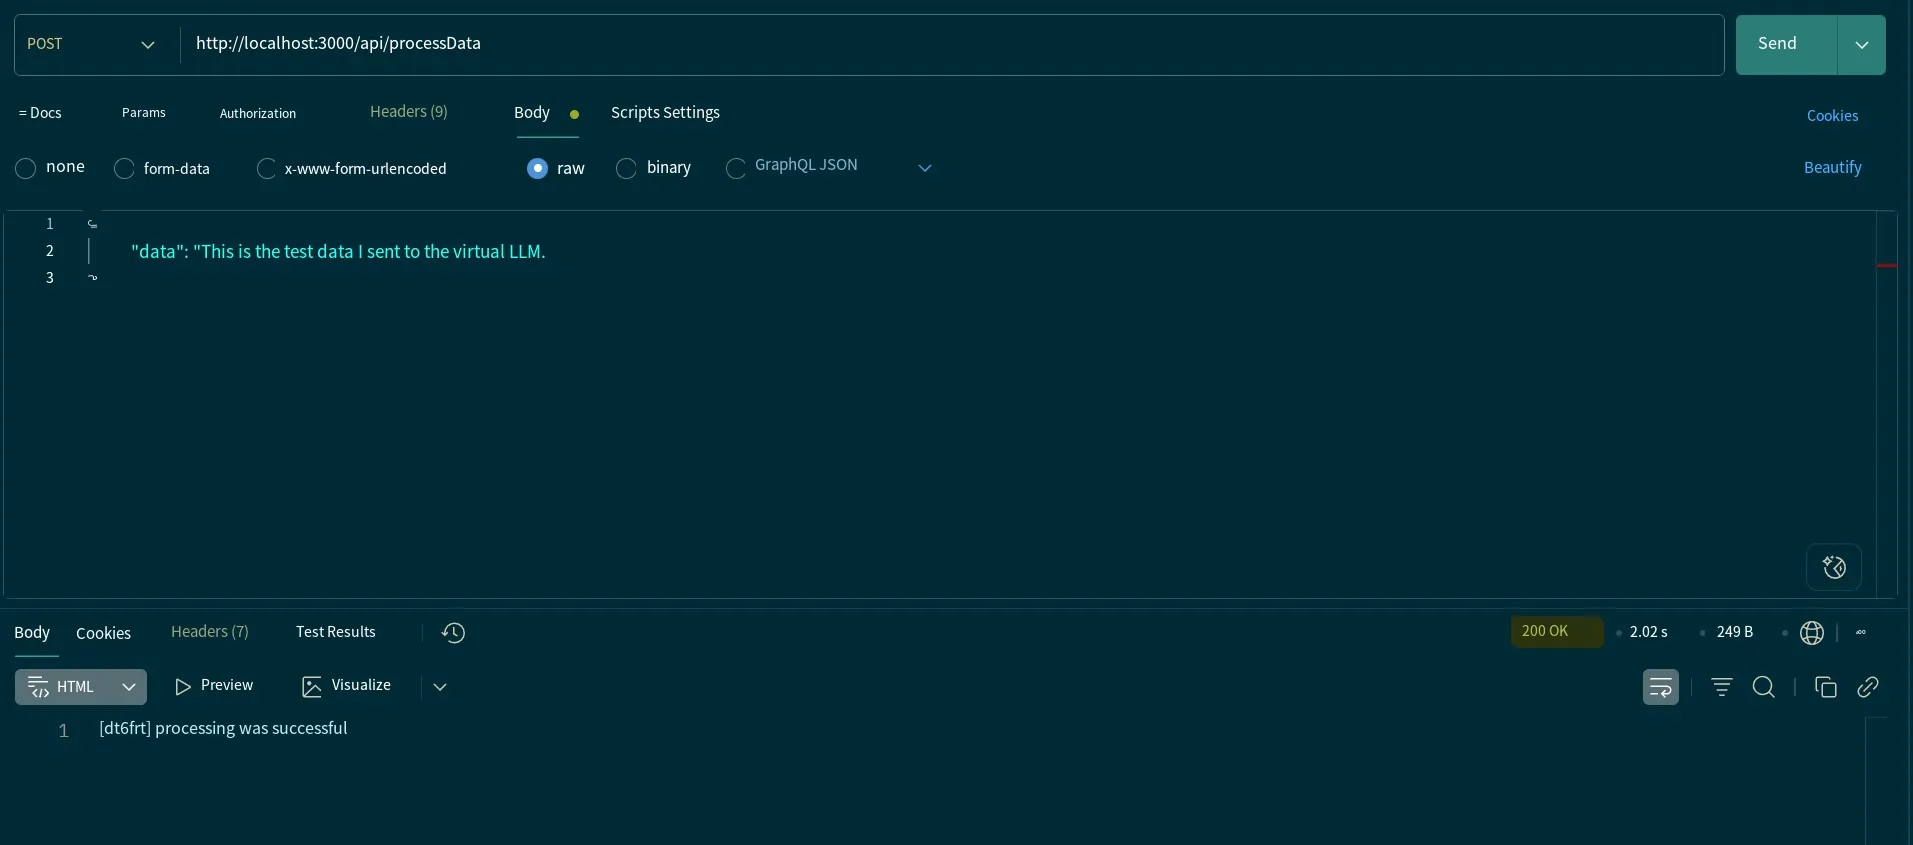
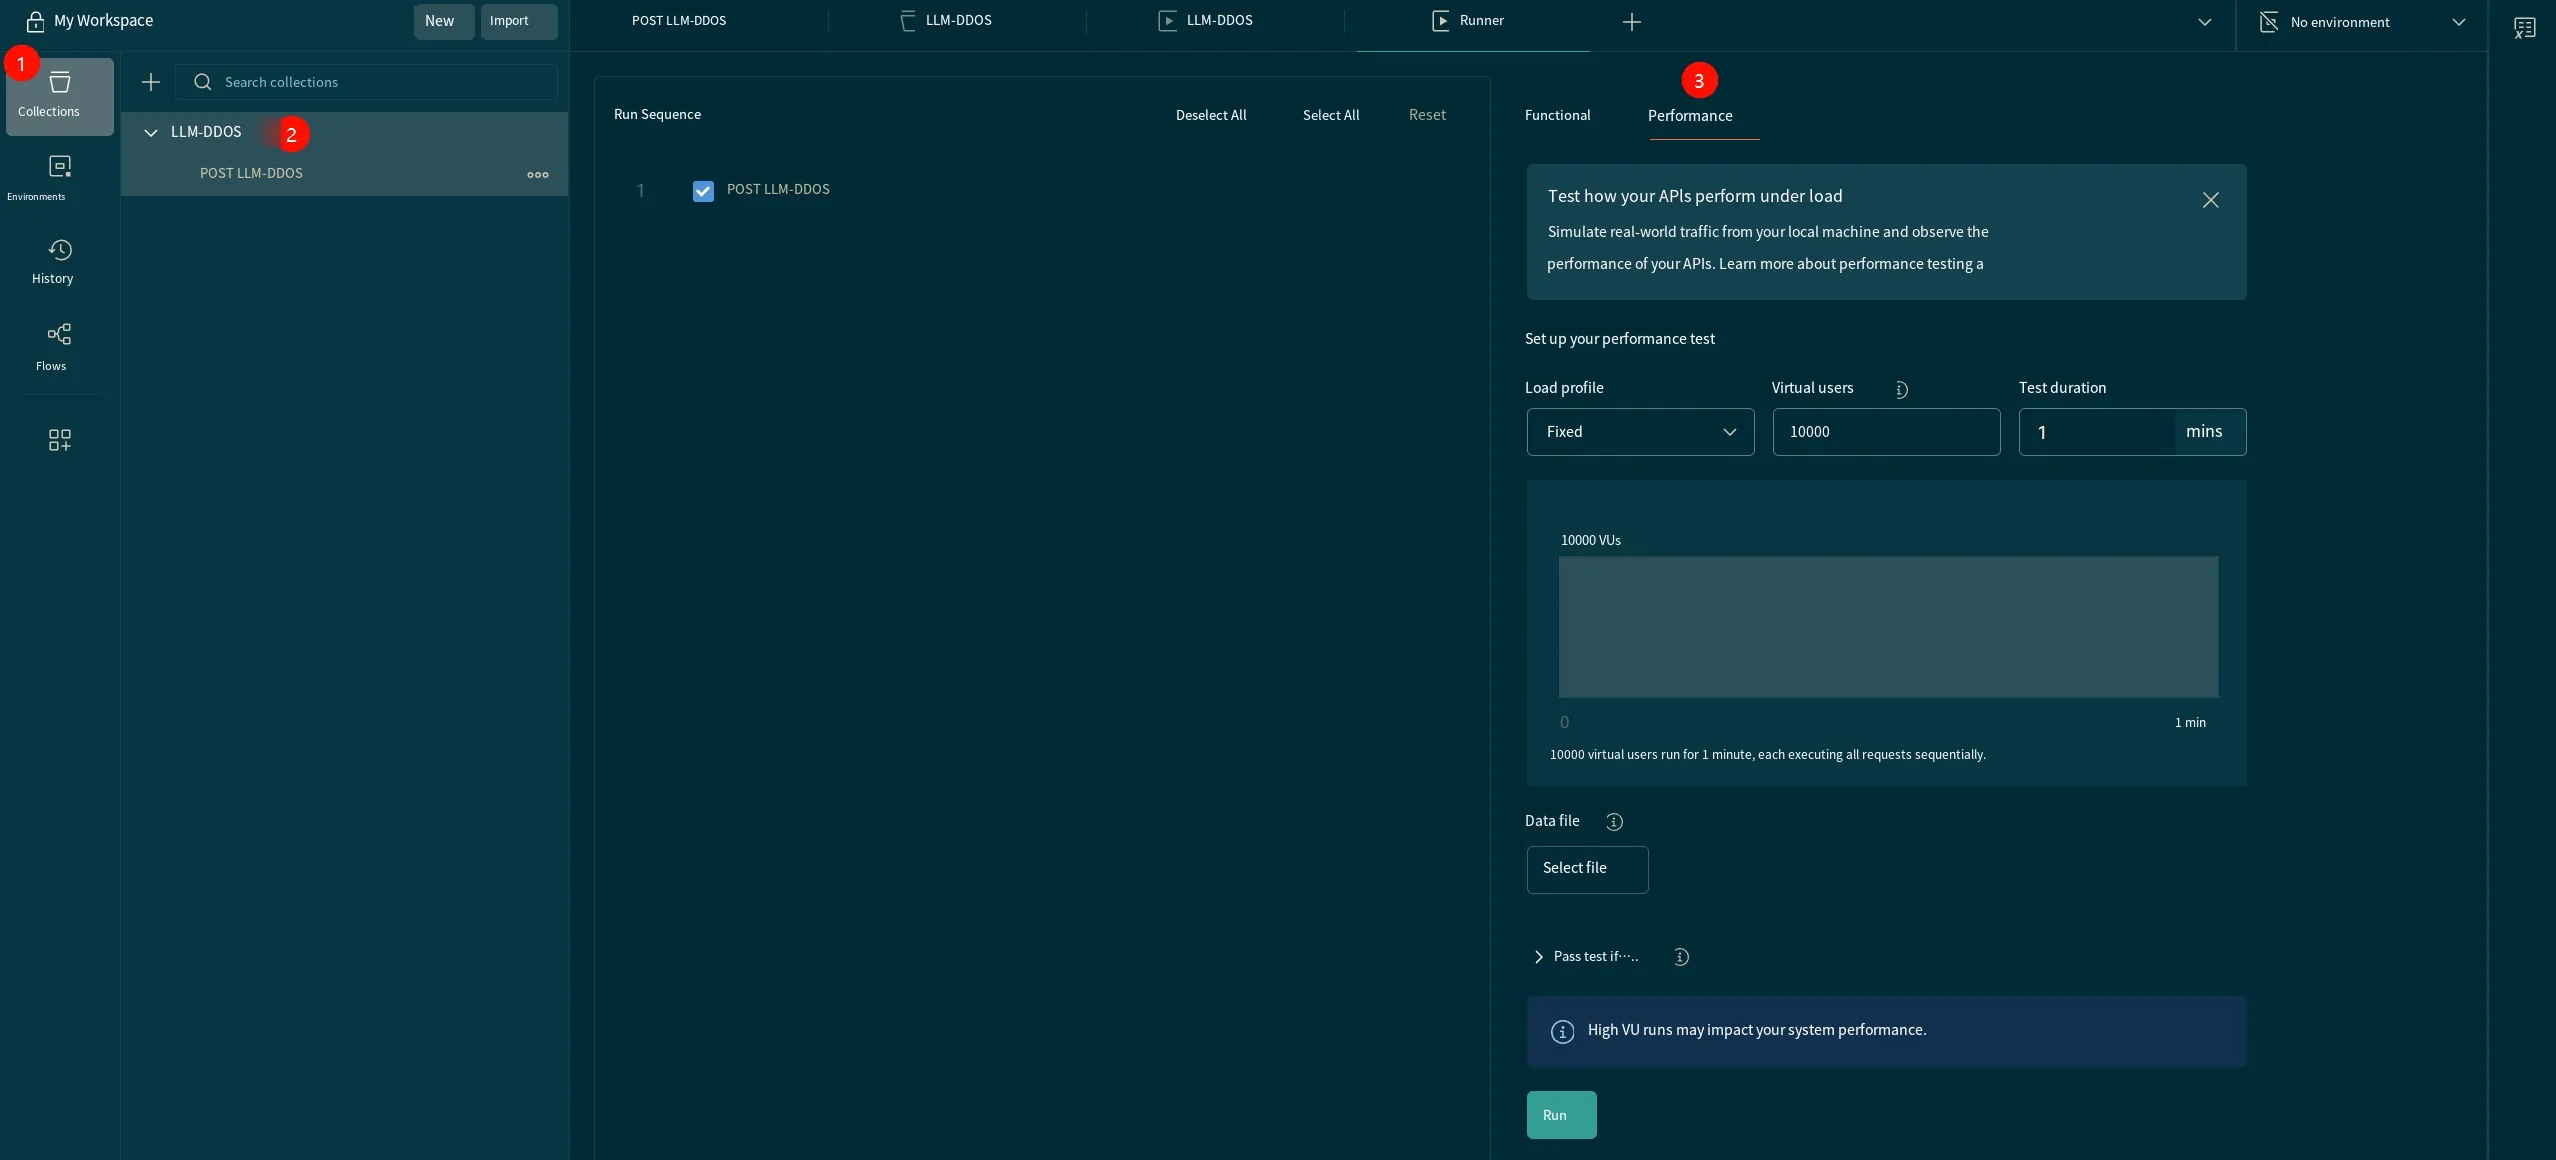
After running the server, you can write a batch script or use tools like Postman. Save the endpoint to a collection, run it, and select Performance testing. The virtual users count simulates concurrent users.
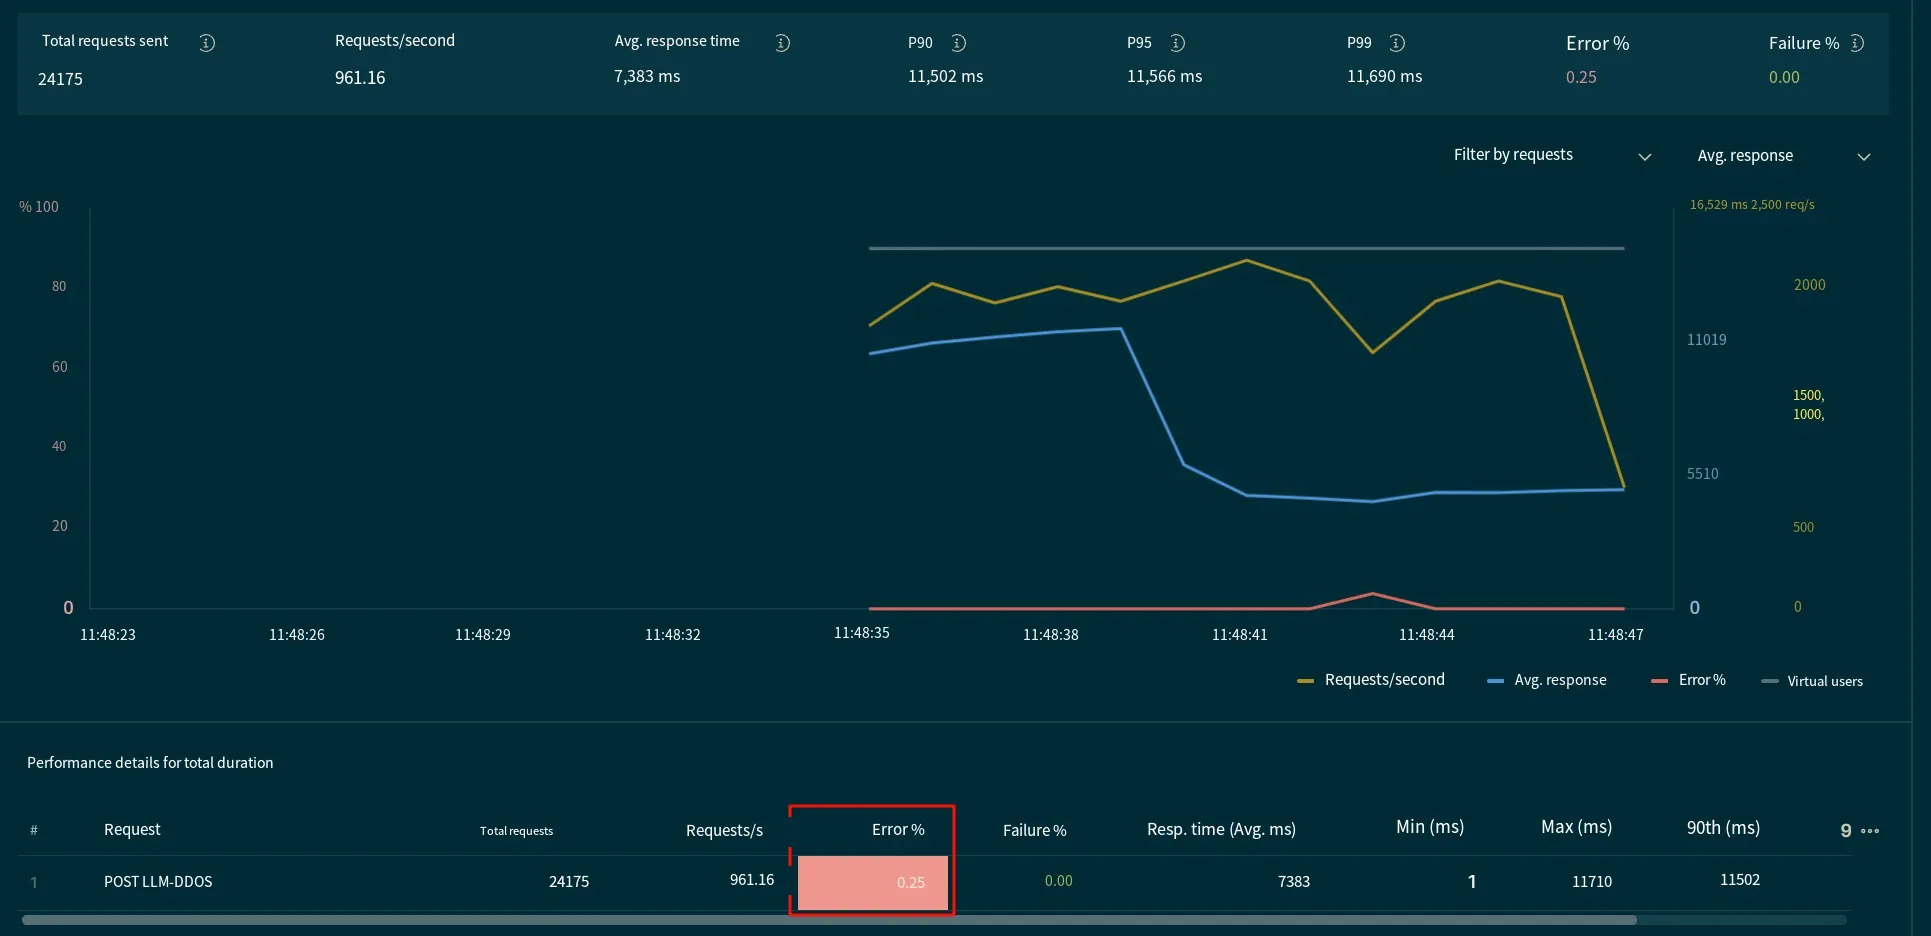
When the number of users increases, failures appear:
The server shows no response:
To mitigate:
- Limit the length of incoming data, effectively bounding input-side tokens.
- Set a maximum number of output tokens (most LLM API providers support this).
- Implement rate limiting (e.g., only X requests per minute per IP).
- Process requests asynchronously to avoid blocking.
The following code incorporates these fixes using express-rate-limit:
npm install express-rate-limitconst express = require('express');const rateLimit = require('express-rate-limit'); // Import rate limiting middlewareconst app = express();
app.use(express.json());
// --- Fix: Rate Limiting ---const limiter = rateLimit({ // Window: 1 minute (1 * 60 * 1000 milliseconds) windowMs: 1 * 60 * 1000, // Within this 1 minute, each IP may only send up to 5 requests max: 5, message: { error: "Too many requests, please try again later" }, standardHeaders: true, legacyHeaders: false,});
// --- Helper function: simulate non-blocking heavy computation (Fix 3) ---function processDataAsync(data) { return new Promise((resolve) => { // Use setImmediate to break up heavy computation logic and avoid blocking the event loop setImmediate(() => { console.log(`Asynchronously processing data of length ${data.length}...`); // Simulate some computation logic resolve(); }); });}
// Secure endpointapp.post('/api/processData', limiter, async (req, res) => { let inputData = req.body.data;
// --- Fix: Input validation and size limit --- if (!inputData || typeof inputData !== 'string') { return res.status(400).send('Invalid input: must provide a string'); } if (inputData.length > 500) { // Limit max length to 500 characters return res.status(413).send('Input too long, please simplify and try again'); }
try { // --- Fix: Asynchronous processing --- await processDataAsync(inputData);
// Simulate calling LLM await new Promise(resolve => setTimeout(resolve, 1000));
console.log("Processing succeeded"); res.status(200).send('Data processing completed'); } catch (error) { res.status(500).send('Internal server error'); }});
const PORT = 3000;app.listen(PORT, () => { console.log(`Secure server running at http://localhost:${PORT}`);});Now requests beyond 5 per minute are rejected:
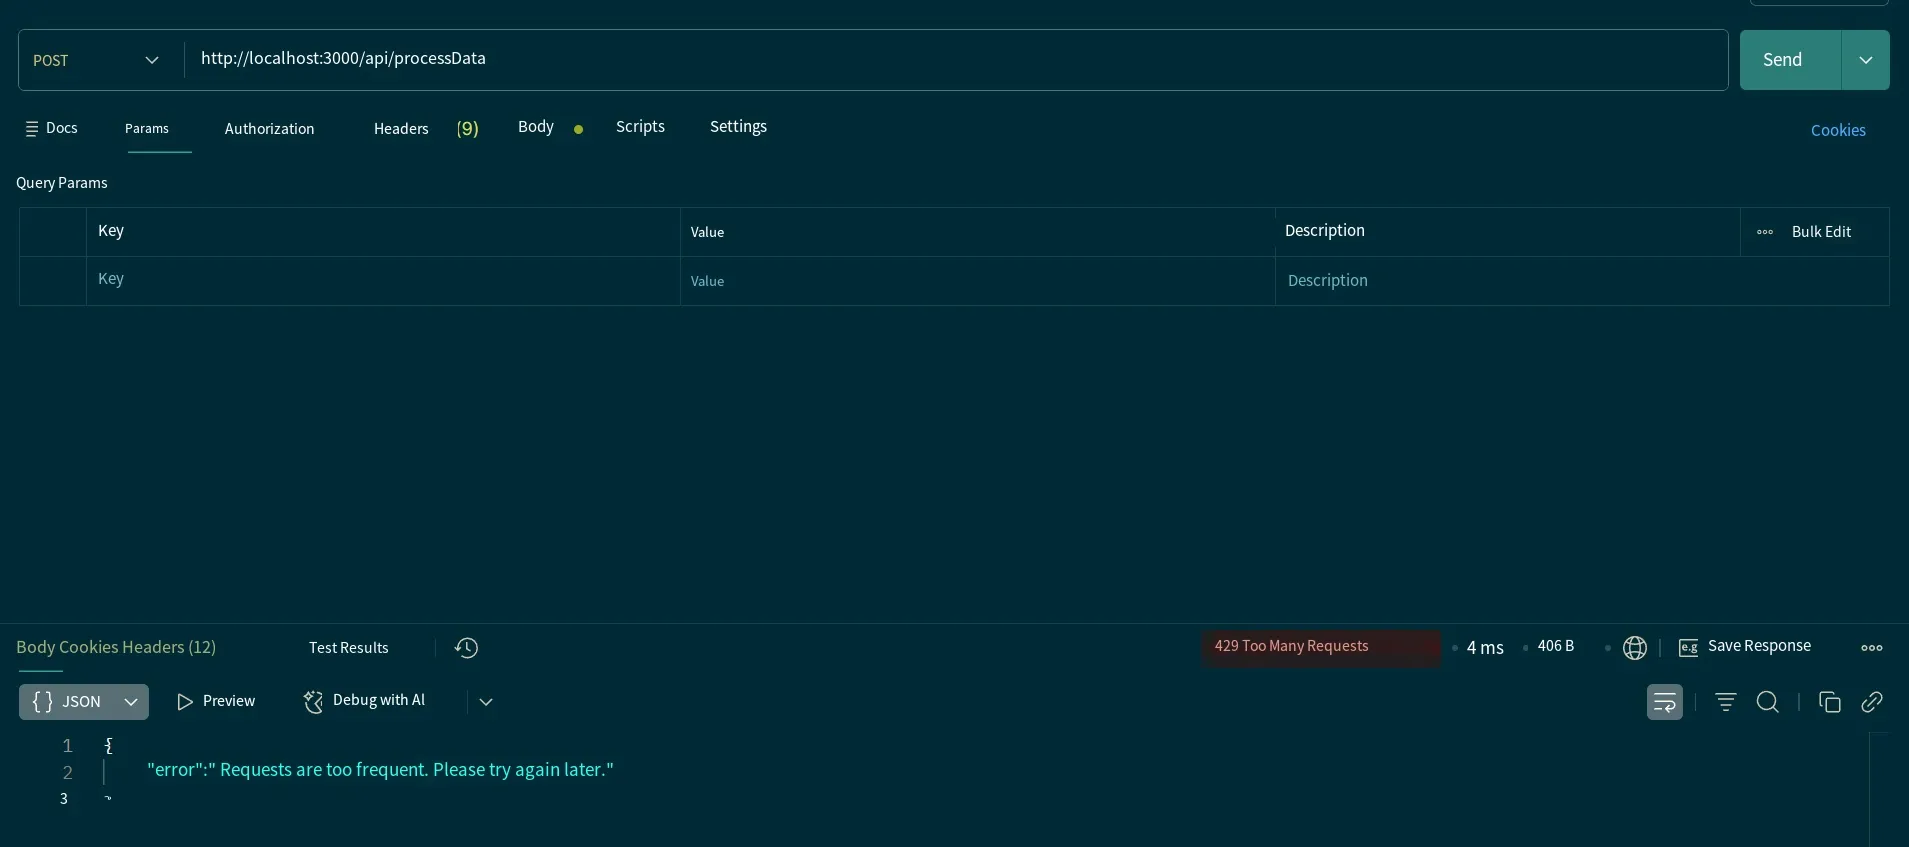
Content exceeding 500 characters is also blocked:
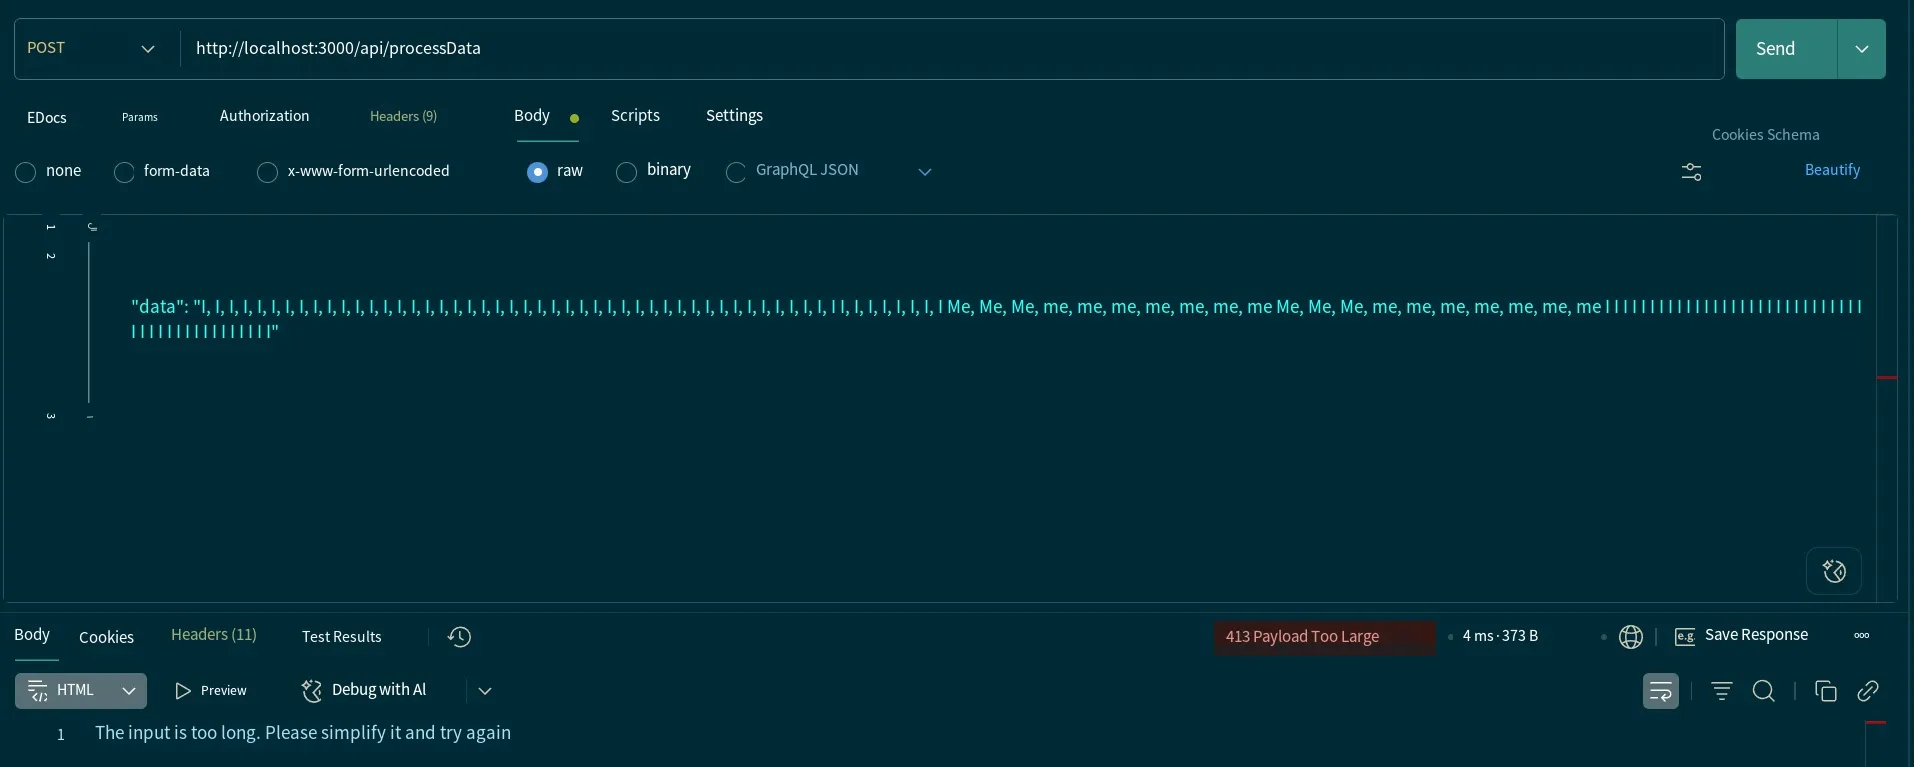
Conclusion
Section titled “Conclusion”The unlimited consumption issue from the LLM Security TOP10 will be discussed separately in a future article. This covers the DDOS aspects of LLM security. Thanks for reading.