Openclaw Secure Usage Guidelines
Openclaw Secure Usage Guidelines
Section titled “Openclaw Secure Usage Guidelines”Preface
Section titled “Preface”Although Openclaw is convenient, it comes with extensive permissions and, if used improperly, introduces many risks. This document records secure usage guidelines for Openclaw to serve as a reference.
Software Updates
Section titled “Software Updates”Because Openclaw receives high attention, security vulnerabilities are frequently disclosed. It is recommended to develop a habit of regularly updating.
1. Update via openclaw itselfopenclaw update2. Update via npmnpm install -g openclaw@latest3. Update via pnpm, either command workspnpm add -g openclaw@latestpnpm update -g openclawLocal Models
Section titled “Local Models”When processing tasks, Openclaw exchanges relevant data with large language models. If online models are used, data leakage may occur. In such cases, for confidential or sensitive information, it is best to use a local large language model. If you are only chatting or searching, online models can be used.
Sensitive Data
Section titled “Sensitive Data”When using online models, it is best not to send sensitive data to the large language model. If sending is unavoidable, it is recommended to perform desensitization. Example data includes:
Personally Identifiable Information (PII): name, ID number, bank card number, home address, etc.Proprietary business data: trade secrets, financial information, strategic plans, customer lists, etc.Technical information: API keys, database credentials, system architecture details, etc.Container Deployment
Section titled “Container Deployment”It is strongly recommended to deploy inside a virtual machine or container, such as VMware or Docker. If deploying on the host machine, it is recommended to use a dedicated computer.
Deployment on production servers, domain controllers, core servers, or primary work computers is prohibited.
Local Access
Section titled “Local Access”For personal use, it is recommended to set access only from localhost (the default configuration), meaning it can only be reached via 127.0.0.1. Even other devices on the same network using internal IPs like 192.168.x.x or 172.x.x.x will not be able to access it.
The following is the default configuration. mode represents the run mode; local means Openclaw runs on the local machine. bind represents the binding address; loopback means only local access is allowed.
"gateway": { "port": 18789, "mode": "local", "bind": "loopback",Dedicated Account Execution
Section titled “Dedicated Account Execution”For the account running Openclaw, adopt the principle of least privilege. Create a dedicated low-privilege system account and run Openclaw under that account to limit its permissions, because Openclaw inherits the permissions of the account that runs it.
At the same time, apply appropriate permissions to the Openclaw directory and configuration file, forbidding other unrelated accounts from reading, writing, or executing them.
chmod 700 ~/.openclawchmod 600 ~/.openclaw/openclaw.jsonChanging the Default Port
Section titled “Changing the Default Port”The default port 18789 is easily scanned. You can change the default port under gateway.port in the configuration file, for example to 8789:
"gateway": { "port": 8789, "mode": "local", "bind": "loopback",Firewall Configuration
Section titled “Firewall Configuration”Use the system firewall to add access rules and only allow local access to Openclaw:
sudo ufw allow from 127.0.0.1 to any port 8789Or add a specific whitelist as needed:
sudo ufw allow from x.x.x.x to any port 8789Strong Token Authentication
Section titled “Strong Token Authentication”Openclaw’s default token length is 32 characters. To increase the difficulty of brute-forcing, you can replace it with a 64-, 128-character key or longer. You can generate one using a model, a password tool, or the following command:
openssl rand -base64 128Or use the following Python command:
python -c "import secrets;print(secrets.token_urlsafe(128))"Session Isolation
Section titled “Session Isolation”Session isolation prevents memory pollution. When talking to Agent A, Agent B cannot see the conversation. This is also very useful when multiple people use Openclaw or when sharing within a team, ensuring everyone’s sessions are independent and non-interfering. This feature is enabled by default; verify the following configuration exists:
"session": { "dmScope": "per-channel-peer" }Secret Management
Section titled “Secret Management”Storing secrets directly in plaintext in the configuration file is not only non-compliant but also easily leads to leakage. It is recommended to store secrets in environment variables. For example, on Windows, create a user-level variable such as DEEPSEEK_API (variable names must be all uppercase) and then reference it in the configuration file using the ${} syntax:
"profiles": { "deepseek:default": { "type": "api_key", "provider": "deepseek", "key": "${DEEPSEEK_API}" }The above form also allows other programs to access the variable. If the environment variable is only used by Openclaw, you can add it under Openclaw’s configuration menu, as shown below.
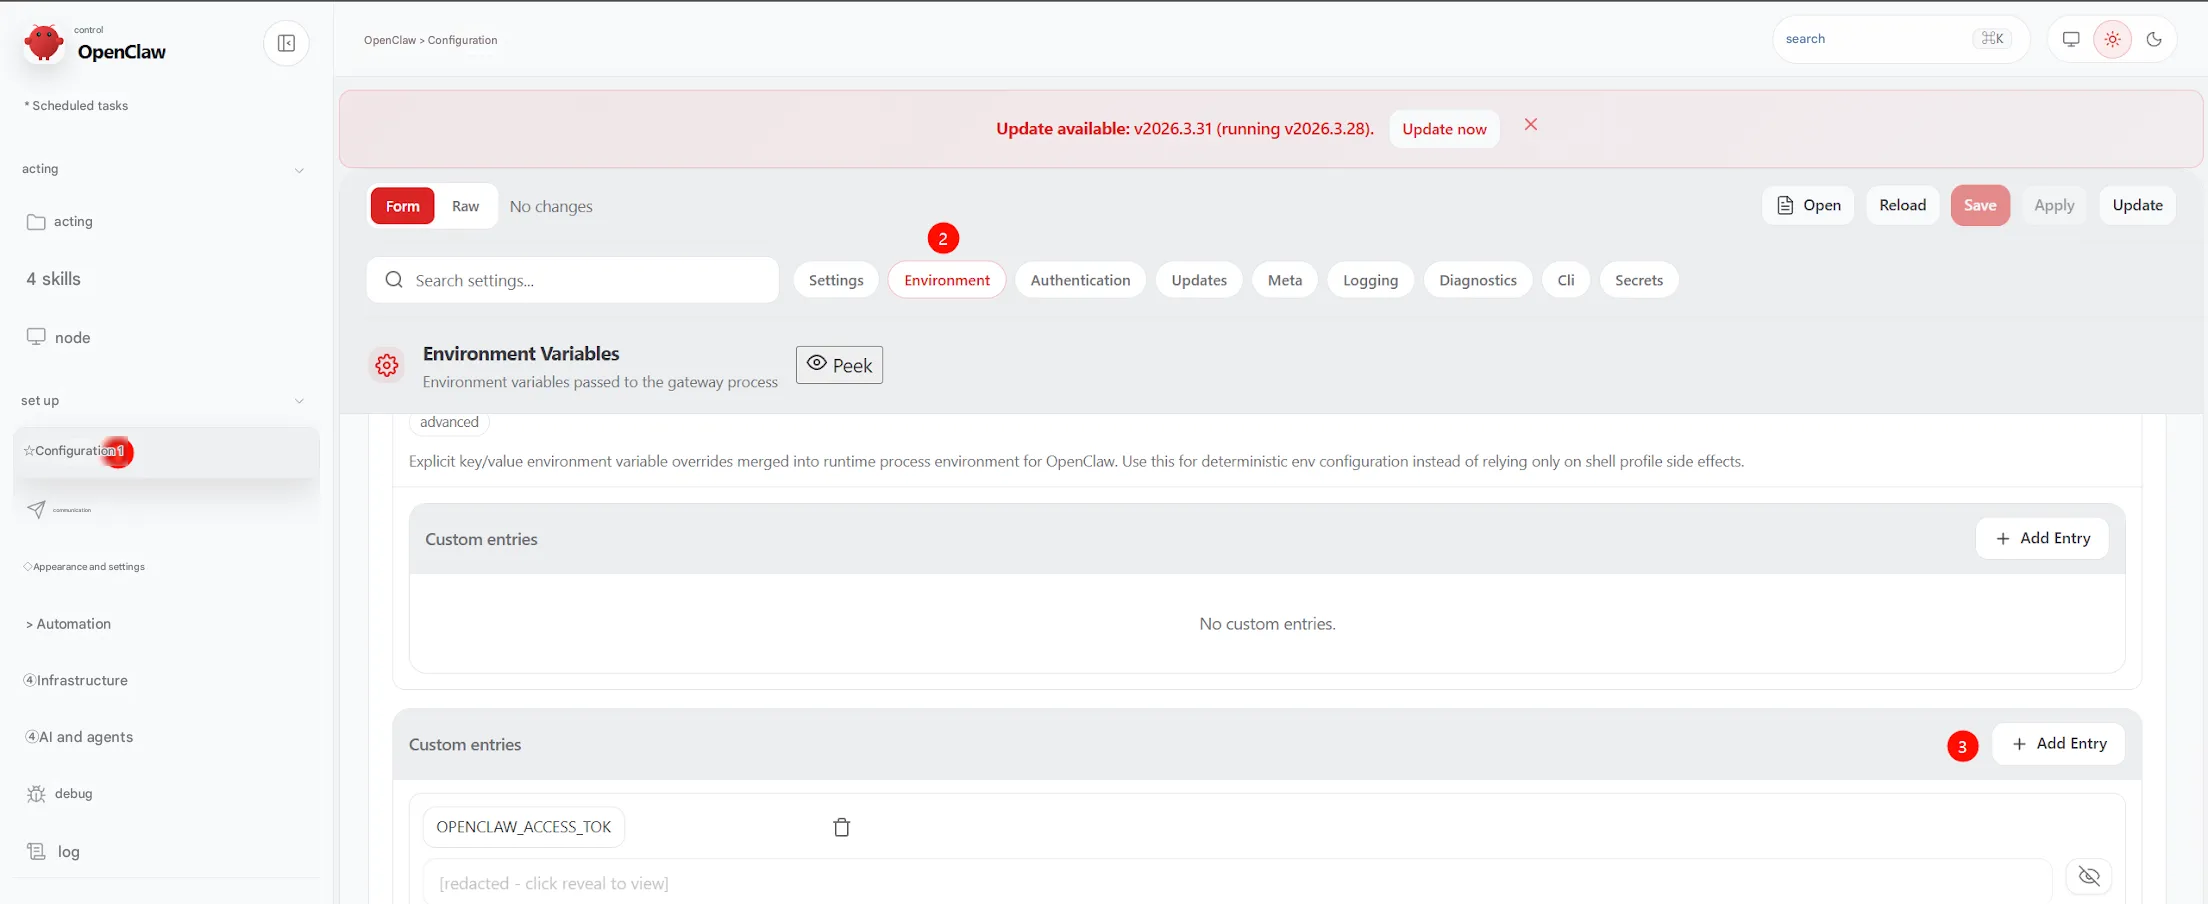
All related secrets for Openclaw can be listed using the following command, which shows the locations of the keys and whether they are stored in plaintext:
openclaw secrets auditPermission Management
Section titled “Permission Management”Multiple agents should be assigned permissions according to the planned functions of each agent. For example, a writing assistant should not be granted command-execution permissions. This can be configured under the Agents tab in the Tools section. It provides several pre-defined categories: Minimal (least privilege), Coding (programming-related), Full (all permissions), and you can also enable or disable individual tools according to your needs.
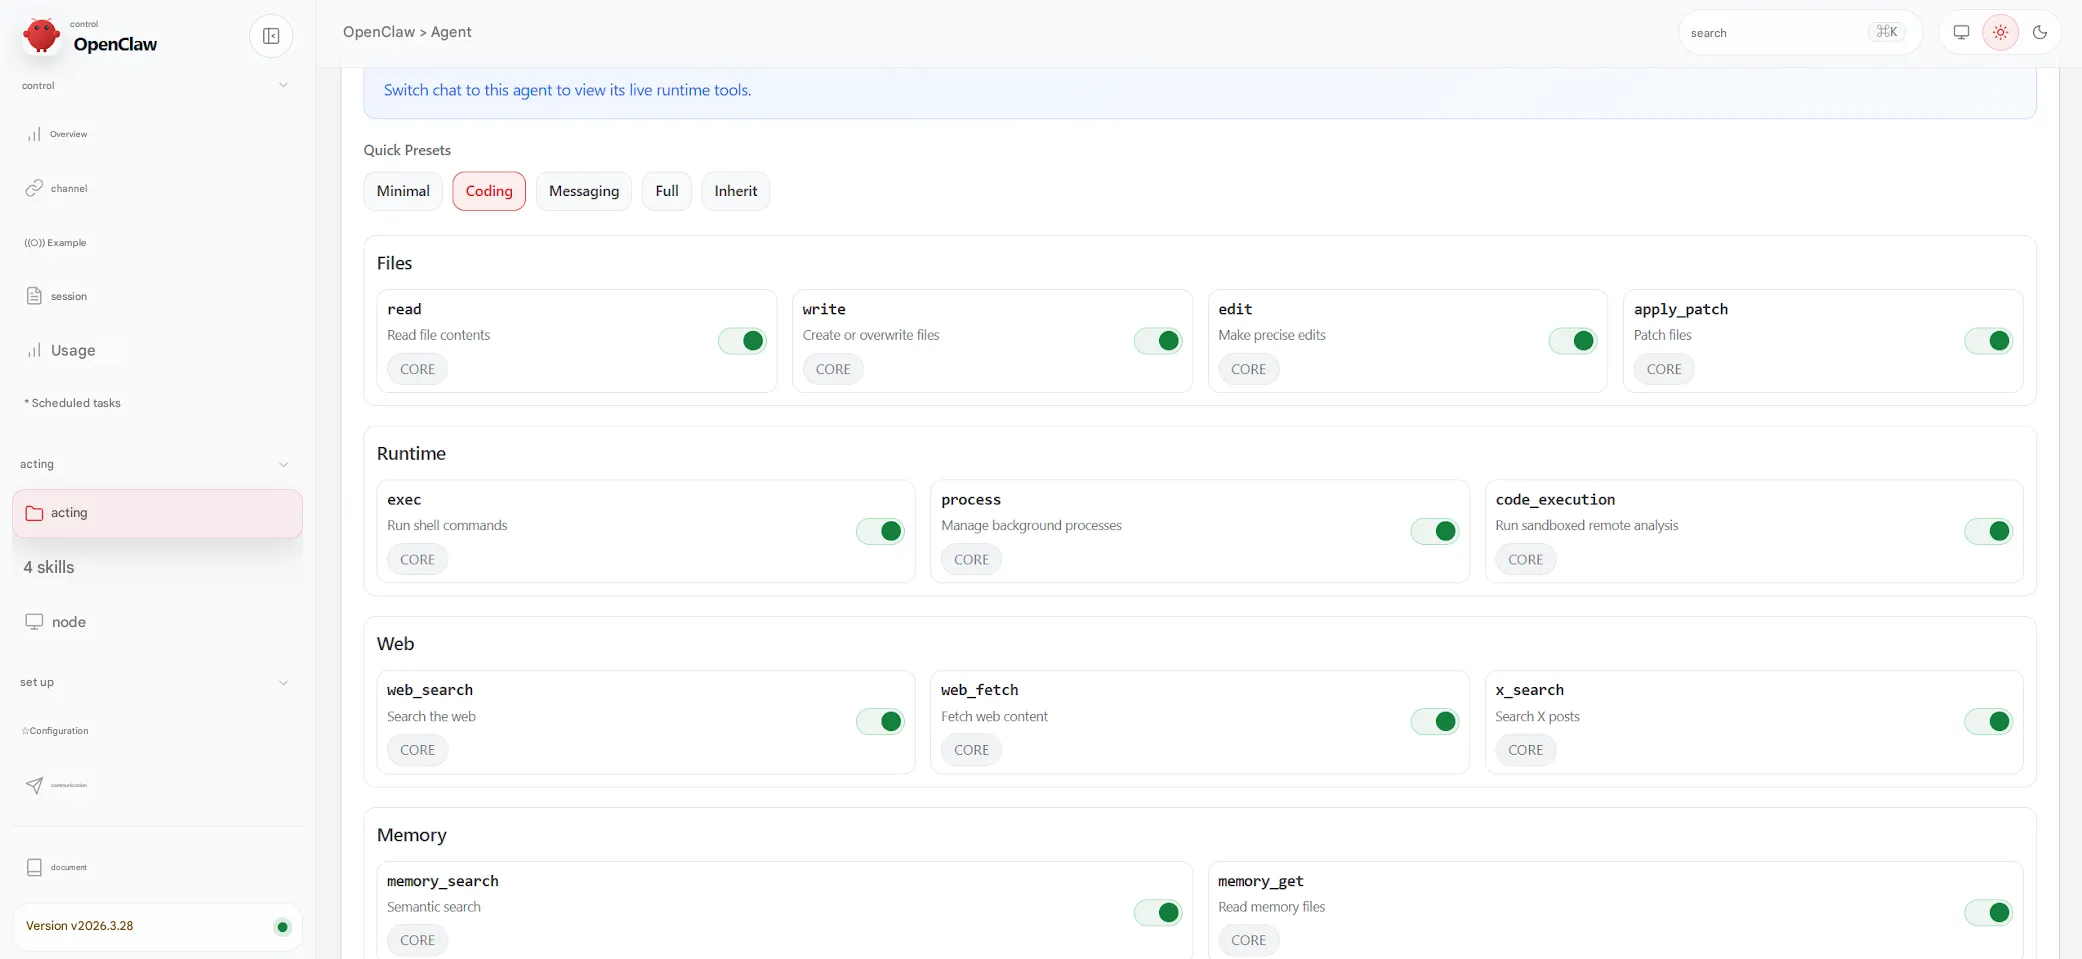
It is recommended to disable high-risk permissions, such as exec (executing arbitrary commands), browser (browser control), web_fetch (fetching external content), and web_search (search engine queries).
SKILL Security
Section titled “SKILL Security”When installing a SKILL, a security review must be performed. This can be a security scan or manual review. Already installed SKILLs should also be inspected periodically. In Openclaw, you can install the following skill to perform security checks on other skills:
https://clawhub.ai/itsclawdbro/skill-defender
Or use the online scanner from Snyk for scanning:
https://github.com/snyk/agent-scan (suitable for automation, CI/CD continuous security assessment)
https://labs.snyk.io/experiments/skill-scan/ (online scanning)
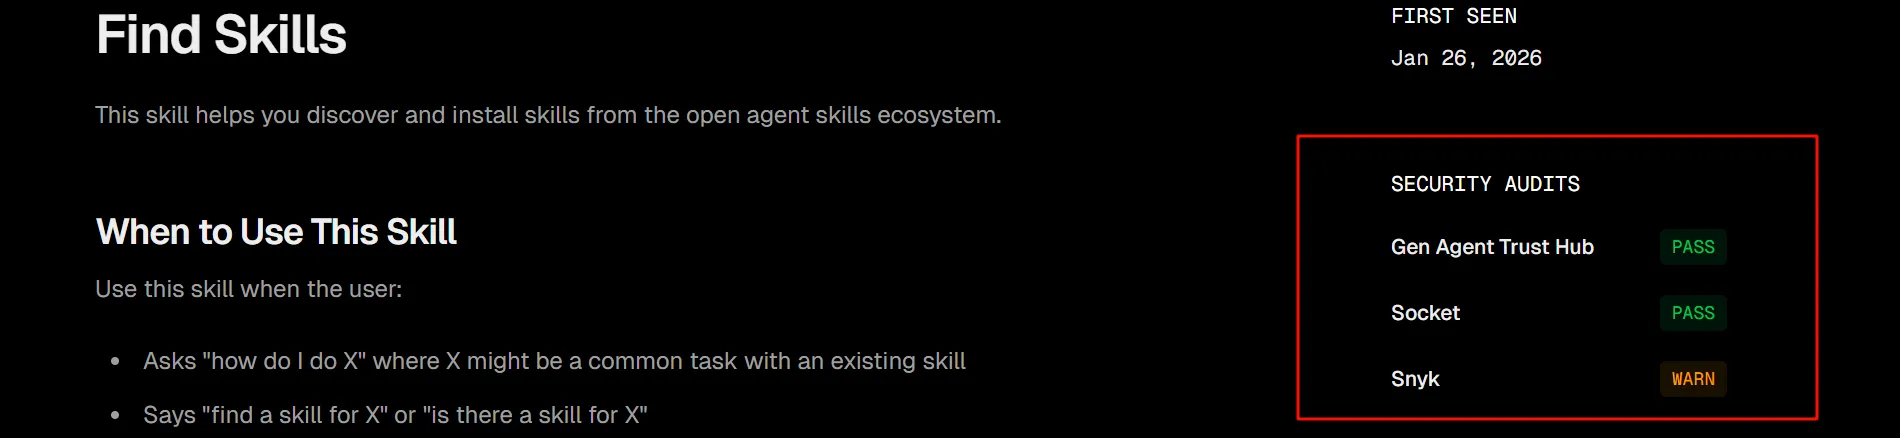
When downloading skills from a skill marketplace:
Be sure to pay attention to the security audit information on the right side. “Trust Hub” is the official review result; “Socket” is from Socket.dev, a top-tier JS/Node.js supply chain security tool; “Snyk” is the online scan mentioned earlier. Pay attention to the detection results in these three areas.
Logging
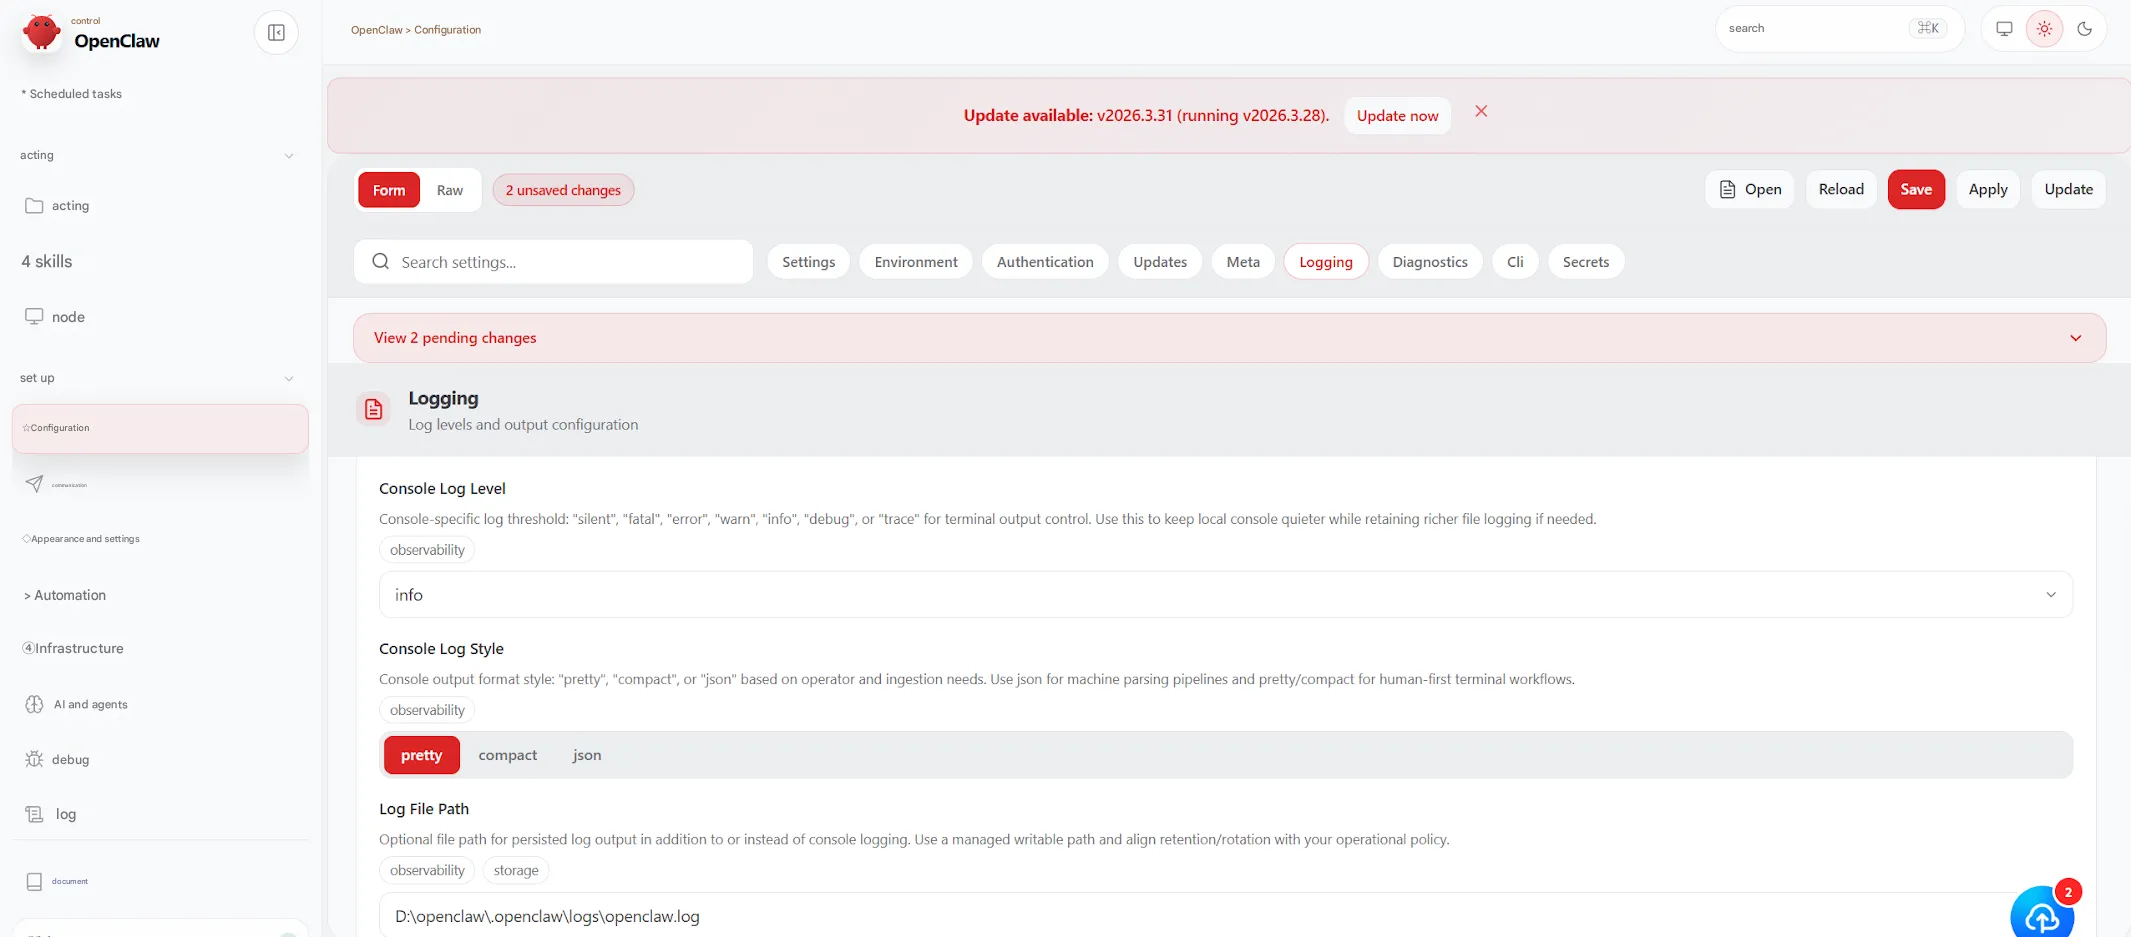
Section titled “Logging”Enable logging and audit capabilities for post-incident review. This can be configured under Configuration - Logging. The relevant parameters are explained below:
Console Log Level: Output level for console logs.
Console Log Style: Style for console log output; “pretty” means colored output.
Log File Path: Directory for storing log files.
Log Level: Output level for log files.
Max File Bytes: Maximum size of a log file, default 500 MB; after exceeding this size, writing stops.
Custom Redaction Patterns: Custom redaction rules to configure which content is redacted when written to logs. This setting overrides the default rules.
Sensitive Data Redaction Mode: Built-in redaction rules. The “tools” option means that sensitive information in tool parameters, passwords, keys, and similar contexts will be redacted before being stored in the log.
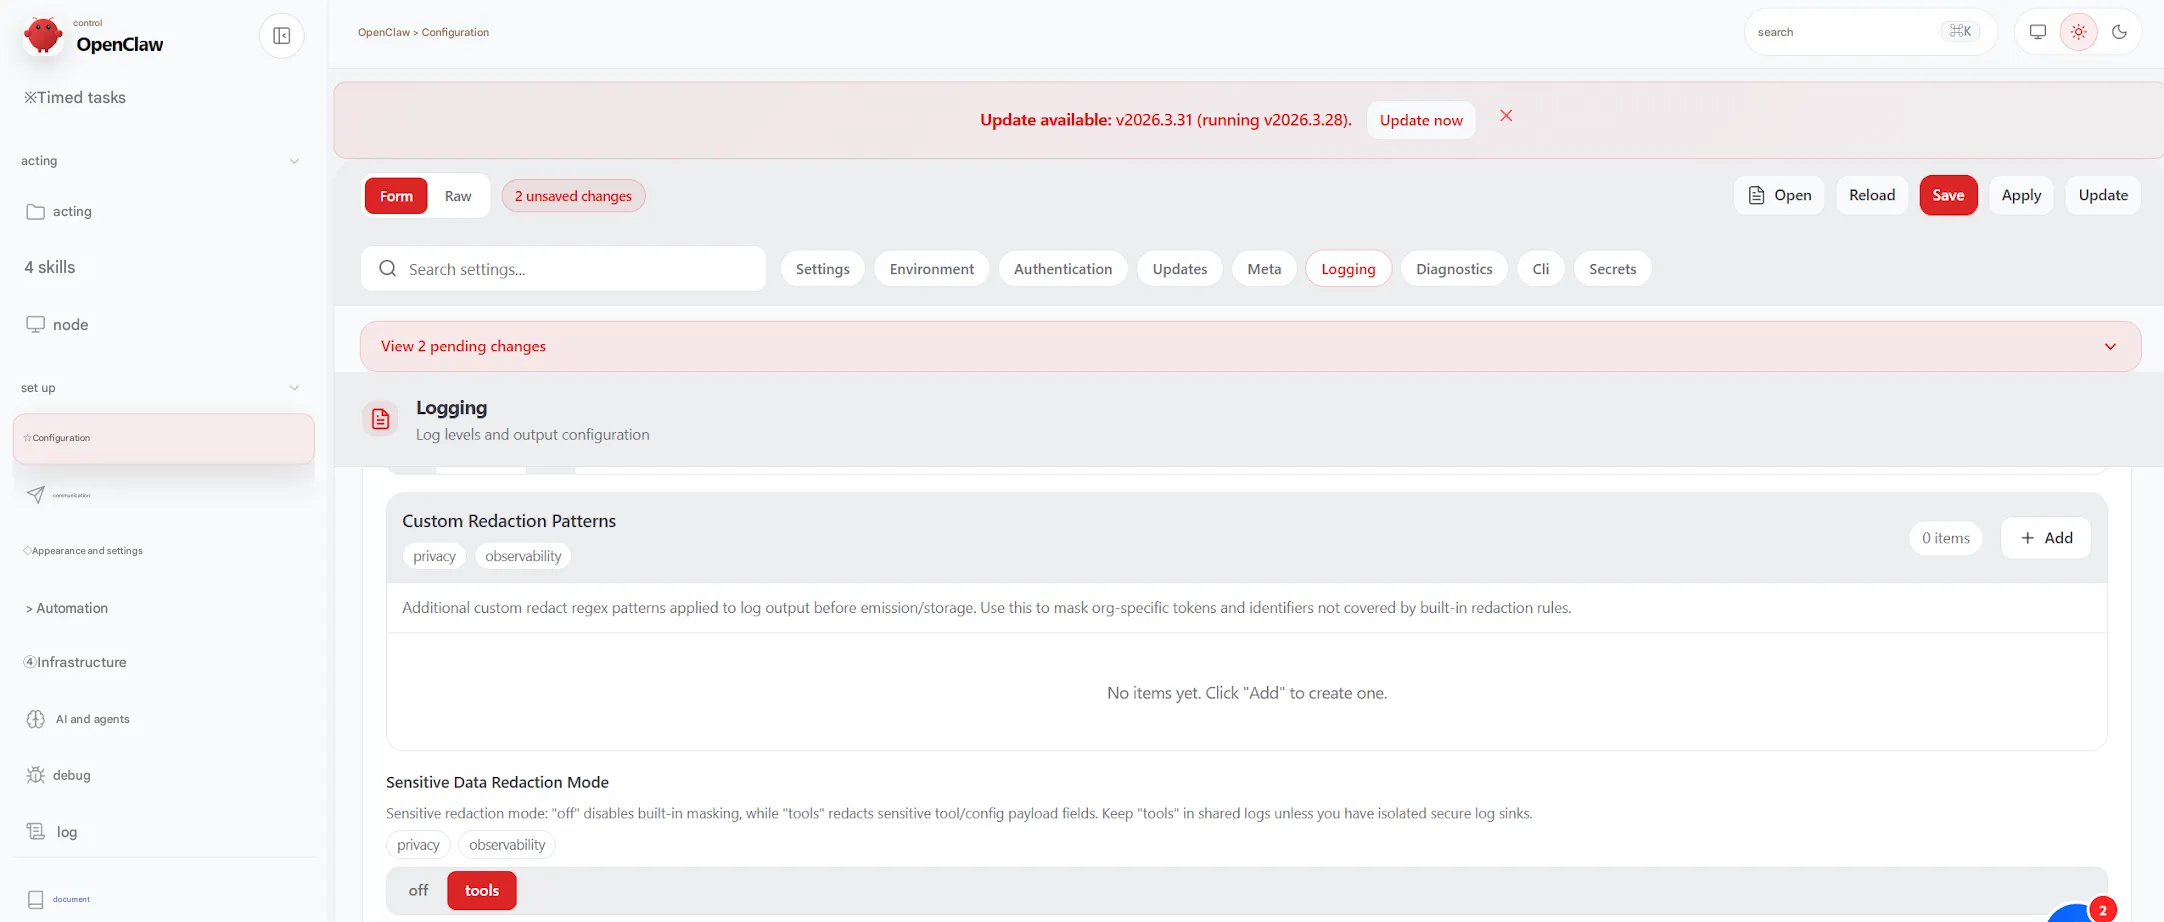
Or add the following content in the configuration file:
"logging": { "level": "debug", "file": "D:\\openclaw\\.openclaw\\logs\\openclaw.log", "consoleLevel": "info", "consoleStyle": "pretty", "redactSensitive": "tools" },Sandbox Isolation
Section titled “Sandbox Isolation”A sandbox provides an independent, isolated, least-privilege runtime environment for agents, so that untrusted operations run inside a container. Add the following configuration under the agents section to create a sandbox for each agent:
"agents": { "defaults": { "sandbox": { "mode": "all", "scope": "agent", "workspaceAccess": "none" },sandbox enables the sandbox feature. mode: “all” means every conversation will run in a sandbox. scope controls how many containers are created; “agent” means one container is created per agent. workspaceAccess determines what is visible inside the sandbox; “none” means only the .openclaw/sandboxes directory is visible. The above is merely an example; adjust according to your own situation.
Note that the default image environment is relatively minimal. Common runtime environments such as Python and Node.js are not available by default, nor is internet access. In addition to configuring all agents under the agents section, you can also configure a sandbox for a specific agent under the list section, as shown below.
"agents": { "list": [ { "id": "research", "sandbox": { "mode": "all", "scope": "agent" } } ]}For detailed configuration and options, refer to the official documentation at:
https://docs.openclaw.ai/zh-CN/gateway/sandboxingdDirect Message Policy
Section titled “Direct Message Policy”If an agent is connected to external channels such as WeCom or Feishu, pay attention to the direct message (DM) policy – who can communicate with the agent via the external bot. For instance, if you create a bot application on Feishu, other employees in the same organization can also find and access the bot, or it can be added to a group where everyone can see it. In such cases, you need to restrict the DM policy.
The default policy is “pairing”, meaning anyone can communicate with the agent, but an authorization code will be provided and needs to be activated on the Openclaw side using a command.
"channels": { "feishu": { "dmPolicy": "pairing",Another option is “allowlist”, meaning only users on the whitelist can communicate. The whitelist must be configured via allowFrom:
"channels": { "feishu": { "dmPolicy": "allowlist", "allowFrom": ["UserID1", "UserID2"]To allow everyone to access, set the policy to “open” and include * in the whitelist. To disable DMs for everyone, set the policy to “disabled”.
Regular Audits
Section titled “Regular Audits”Use the built-in security audit function for regular audits. The command is:
openclaw security audit --deepThis command checks for common security risks, such as exposed gateway authentication, exposed browser control, excessive file system permissions, etc. You can use the fix parameter to apply fixes:
openclaw security audit --fixThis fix command applies certain security measures. For example, if the privacy policy is “open”, it will be changed to “allowlist”. If the sensitive data redaction rule for logging is “off”, it will be changed to “tools”. It also ensures the Openclaw directory has permissions 700 and the configuration file has 600, and so on.
Incident Response
Section titled “Incident Response”If you discover that Openclaw has come under attack, you may follow these steps for incident response:
I. Containment and Isolation
1. Stop the Openclaw service.2. Disconnect network connections.3. Change the access policy `dmPolicy` of risky channels to “disabled”.II. Eradication and Credential Rotation
1. Change Openclaw’s access token.2. If model credentials were leaked, delete the compromised keys.3. Re-issue tokens for channels like Feishu and WeCom.4. If Openclaw accesses databases, cloud services, email, etc., change the corresponding passwords and keys.5. Check the skill directories and remove plugins of unknown or unauthorized origin.III. Investigation and Evidence Collection
1. Collect logs; the specific log path depends on your configuration.2. Collect conversation records, back up all `jsonl` files under `~/.openclaw/agents/<agentId>/sessions/`.3. Collect system logs to check for abnormal logins, command execution, etc.4. Collect abnormal IPs, abnormal users, and content containing prompt injections, etc.IV. Recovery and Rebuilding
1. Ensure relevant issues have been fixed and preventive measures have been added.2. Gradually restore services and closely monitor them.3. Write an incident retrospect report, including the timeline, root cause, impact assessment, handling process, lessons learned, and planned follow-up improvements.Summary
Section titled “Summary”For more information on using and configuring Openclaw, refer to the official documentation:
https://docs.openclaw.ai/zh-CNThe above are security guidelines for using Openclaw. Thank you for reading.